Creating a Social Media Presence and Getting the Most Out of It, Part I
Social media has become a driving force in whether or not a consumer purchases – or doesn’t purchase – a product which can make or break a brand. There are a multitude of social media outlets these days and getting immersed in each is a full-time job in and of itself. What’s more, if you don’t know how to go about setting up your social media sites to get the most out of them, the part they’ll play as part of your online marketing will be minimal and thus, non-effective.
That said, let’s start building a strong social media presence by working on one social media site that has set the standard for social media marketing – Facebook. Facebook, as of October, 2018, had over 2.23 billion active users – 2.23 BILLION! With a “b!” It is a must-have for any – no, EVERY business. It’s really no longer an “option” to have a presence on Facebook, it’s a necessity. So, without further ado, let’s talk about how to go about setting up a business page on Facebook by following these steps:
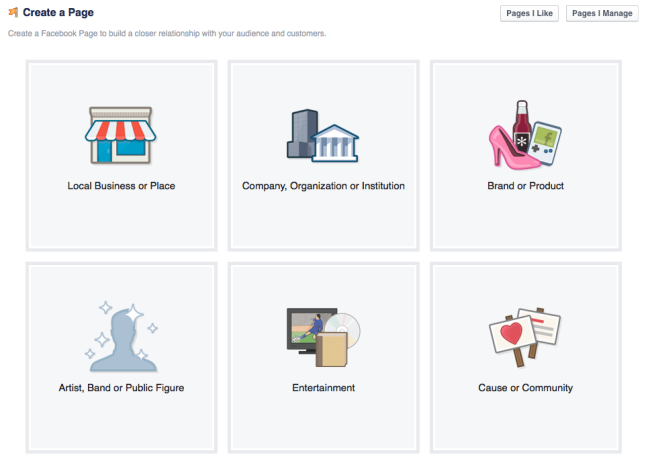
Step 1: Go to Facebook Create Page.
Step 2: Choose the type of page you want to create.
There are six different types of pages on Facebook:
- Local Business or Place
- Company, Organization, or Institution (sic)
- Brand or Product
- Artist, Band, or Public Figure
- Entertainment
- Cause or Community
Since we’re attempting to set up a business page, we’re going to select Local Business or Place.
Step 3: Fill in the necessary fields and click the “Get Started” button.
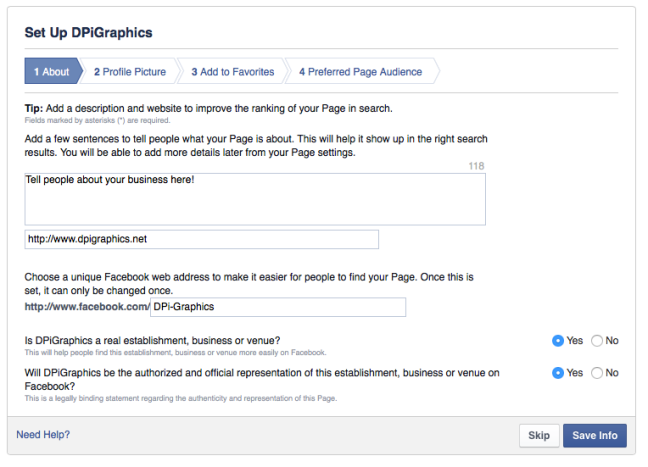
Step 4: Type out some basic information about your business.
Your page description shouldn’t be War and Peace. It doesn’t even have to be a company statement or mission – it could be a promotion, sale, advertisement – BUT make it pertinent to the purpose of the page, otherwise, it’ll look fraudulent to visitors.
This short description will show on the right sidebar of your page and will be directly visible to your fans. A longer description for your company background can be added later and will appear on the “About” tab of your page. Don’t be too wordy though. Give your visitors enough information to let them know who you are, what you sell/do and why they should be your customer but not too much so that they leave without reading the whole description.
Near the bottom, in the field “Enter an address for your Page”, you must create a short and unique username for your business as this will become your Facebook URL. This URL should be meaningful and care should be taken when creating it as it cannot be changed after the page has been created.
Step 5: Rock your Facebook page.
You’ll need to upload a profile picture, I suggest using your logo or something meaningful about your business. You can change this anytime you like, for example, making seasonal changes, holidays, etc. You’ll want to update your cover photo as well – cover photos, in case you’re interested in creating a custom image, are 851 px x 315 px for computers. These dimensions differ depending on the device they are viewed and uploaded from, so if you’re interested in knowing more, read this.
Next, you’ll want to add your page to your favorites so that it’s easier find and update later. Your page will later be easily accessed from the upper left side of your Facebook home page feed.
Finally, you’ll be asked who your preferred page audience is. This will allow you to fill in information about the kinds of people you want seeing your page. The page is viewable by anyone, however, using Facebook’s page suggestion feature, your page is more likely to be put in front of people who meet your location, age gender and interests as you’ve specified here. We highly encourage this so don’t skip this step!
How to Setup a Business Page on Twitter
Twitter, while not quite as popular as Facebook, has a growing population of users – particularly younger folks who communicate with friends, celebrities, businesses – pretty much the entire world all on Twitter. If you don’t already know, Twitter posts are no more than 140 characters in length and utilize the hashtag (#) to “tag” people, places, things (again, pretty much the entire world.)
This growing market is a great way to keep up with other businesses, share ideas, solicit for feedback – Twitter has a multitude of uses. As important as it is to be on Facebook, it’s important to be on Twitter as well.
Don’t feel like you can get your message across in 140 characters or less? Don’t want another social media site to update? Well, we’ve got a solution for that. First, let’s set you up a Twitter account…
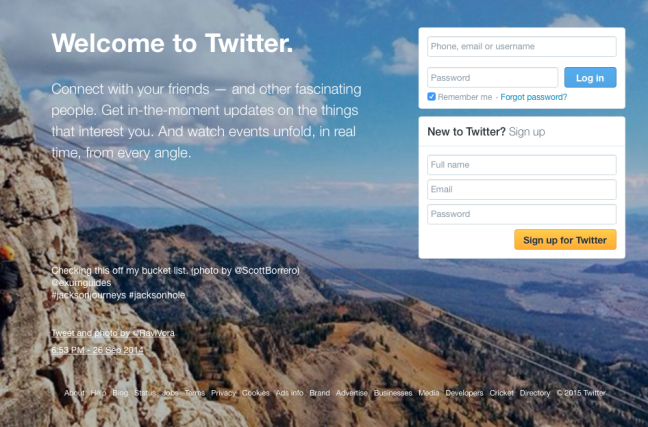
Step 1: Go to Twitter and add your details in the boxes next to the “Welcome to Twitter. ” header.
Since you’re creating this one for your business, you will have to input your business name under the “Full Name” field. Then, type in your email and create a strong password.
Step 2: After clicking on the “Sign up for Twitter” button, you will then be redirected to a page where you can choose your username.
You must be very careful when choosing your username, which is also referred to as your Twitter handle. Although you can change it later, it may be more difficult later to come up with a name that is both unique and meaningful for your business.
Here are some tips in creating your Twitter handle:
- Try to keep it short, but do not overly abbreviate your brand. Make sure it’s still easily recognizable. Make it easily findable (as easy as possible among the millions of Twitter users) and a name that a customer would be able to use to find you.
- If the Twitter handle you like is taken, add identifiers like your location (USA) or the word “Official”.
Step 3: Your account is now created! After you click the “Let’s go” button, you may choose to go through the next steps, you’ll be asked a series of questions such as what your interests are, suggestions for Twitter users to follow and customizing options.
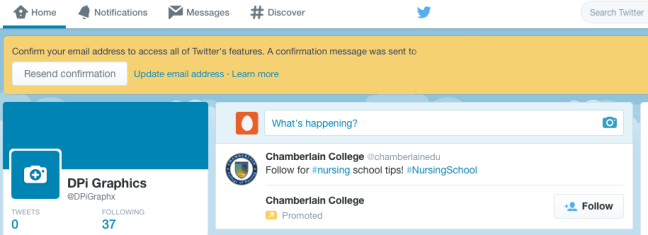
The last step will require you to confirm the email address you entered back on the sign-up page. So…
Step 5: Verify your email!
Once you’ve confirmed your email, you’ll also be asked to upload a profile and cover photo, as well as write a short biography of your company. That’s it!
Now, remember how I said I had a solution to having to update both Facebook AND Twitter? Well, here’s a little secret I’m going to let you in on…
To connect your Facebook Page to your new Twitter Account
-
- Step 1:Go to www.facebook.com/twitter
- Step 2:Select the page that you want to connect to your new Twitter account by clicking Link to Twitter.
- Step 3:The page will redirect to Twitter’s authorization page.

- Step 4:Click Authorize app and Twitter will authorize Facebook to post on behalf of you to your Twitter account. Twitter will then redirect back to your Facebook page management.
- Step 5:Select the options that you want to post to Twitter via your Facebook page, then click Save Changes.
That’s it! You’re Facebook business page posts will now automatically post to Twitter as they get posted. You do not even have to log in to Twitter to post! How cool is that? Of course, if you want to post directly from Twitter, you can always do that. Your posts however, won’t be posted to your Facebook page automatically.These are just two of a multitude of social media options that are necessary for your business to be using. If you’re not on Facebook or Twitter, I suggest you get on them, TODAY!


